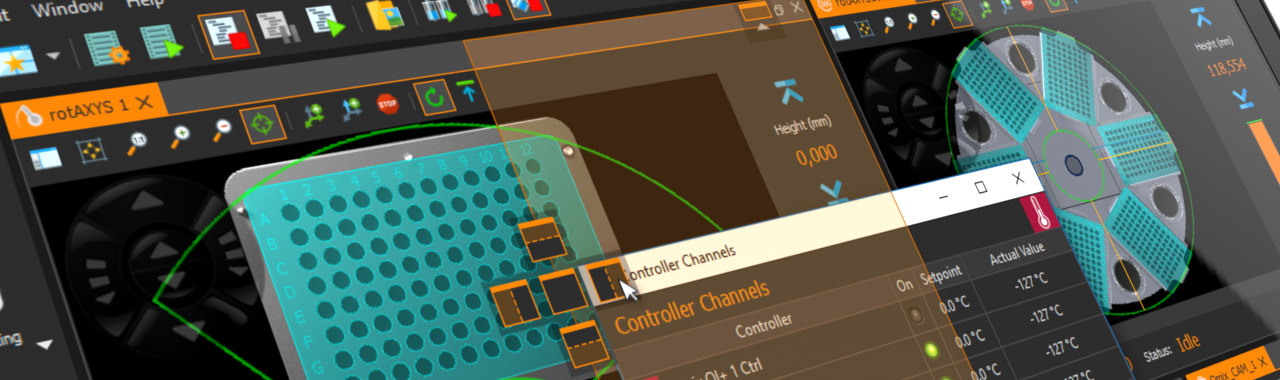
CETONI Elements now supports precision scales
CETONI8. June 2021
To get the best results, start by importing your container's CAD file (usually a .collada or .obj file). Use the to "wrap" the virtual sleeve around it. Once the 3D setup is linked to Illustrator, your 2D workspace becomes a "live" window into the final product.
If you are setting up a workflow, you typically use the to create the technical "window" for the graphics, and Studio 10 to visualize the artwork inside that window.
plugin to instantly calculate and apply "counter-distortion" to your artwork, ensuring graphics appear correctly on the final curved surface. Multi-Pack Support
Mastering 3D Packaging Design: Esko Studio and Visualizer Studio Toolkit for Shrink Sleeves
Before exploring the solution, it is critical to understand the physics of shrink sleeves. The film is printed in a flat web format, then wrapped around the product and shrunk. The degree of shrinkage varies depending on the substrate (PVC, PETG, OPS), the temperature, and the product’s geometry (cylinders, ovals, or complex containers with indentations). To get the best results, start by importing
Esko Studio 10 and the Visualizer Studio Toolkit are essential tools for any designer or prepress specialist working with shrink sleeves. By offering a combination of accurate physical simulation, non-destructive distortion, and photorealistic visualization, the Esko suite allows for the creation of stunning, high-quality packaging that perfectly fits the brand's vision.
Visualize where the seam will appear on the final product to ensure it doesn't interrupt crucial branding. 5. Benefits for Designers and Converters
You stop wasting money on physical test prints and prototype materials.
Are you encountering issues with specific like matte varnishes or metallic foils? Share public link If you are setting up a workflow, you
To help me tailor any further technical advice, let me know:
With the 3D model loaded into the Toolkit application, you add a sleeve and define the crucial parameters of the simulation. This is where the toolkit's unique intelligence comes into play. You specify:
Studio 10 runs as a panel inside Illustrator.
Alternatively, if you're looking for help with other aspects of the packaging process, I can: Explain how the Esko DeskPack plugin works. Discuss Esko's Color Management tools. Explain how to optimize pre-press processes. Let me know which topic is most helpful for you! Studio Toolkit for Shrink Sleeves User Guide | Esko The film is printed in a flat web
: The resulting 3D structure (saved as a Collada file) is opened in Adobe Illustrator via the Studio Designer plugin, allowing the 2D artwork to be viewed instantly on the 3D model. Key Features and Tools Predistortion (Artwork Compensation)
Before these tools, designing for shrink sleeves was largely a matter of "trial and error". When a flat label is heated to fit a curved container, the artwork distorts—often moving branding or warping logos into unrecognizable shapes. Designers essentially worked "blind," requiring multiple physical mockups and physical shrink tunnel tests to see if a design would work. The Solution: Virtual Shrink Simulation
This is the pro-level trick.
Bring your flat Illustrator art into the Studio 10 scene. Drag the flat design onto the 3D bottle. At this point, it will look misaligned because it hasn’t been distorted.
The transformative impact of this software isn't just theoretical. Industry leaders and creative agencies have integrated it into their core workflows with stunning results.
 CETONI Elements now supports precision scales
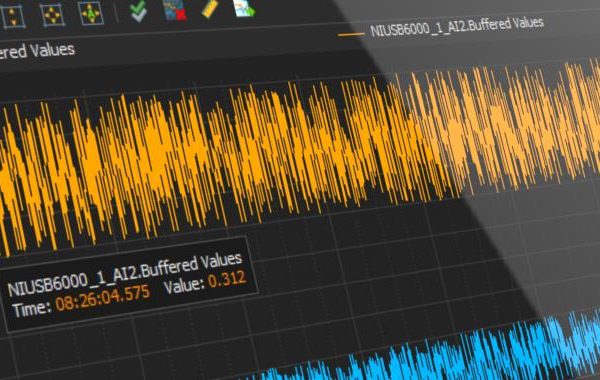
 New features and improvements in Qmix Elements